

You can recover photos that have disappeared from your Mac using any of the methods described in this article.
Photos vanished from Mac? Faulty updates, data overwrite, and even something as simple as forgetting to turn on iCloud are just a few of the causes that this could occur. We can try a variety of solutions, depending on what went wrong with your photos.
Don’t panic; we’ve got 6 ways for you to retrieve your deleted, lost, or missing Mac photos and photo albums.
Why Mac Photos Album Disappeared?
The sudden disappearance of your photos from your Mac could be caused by a number of factors. Some of the common issues which users have reported are given below:
- While updating macOS, it deleted all of your important files and photos
- Abrupt power failure which resulted in data loss
- Unintentionally or accidentally sending your desktop files to another such location as Trash and forgetting all about it
- Desktop files and photos are hidden
- Your Mac files and photos are synced with iCloud Drive then which can result in making them disappear from the desktop screen
- Some kind of virus or malware entered the system and has caused the disappearance or formatting of photos on Mac

The important thing is to know how to recover those files even if you don’t always know why your Mac’s photos disappeared in the first place. In this blog, we’ll talk about a number of sensible solutions to this problem.
How to Recover Disappeared Photos from Mac?
When they are unable to find or recover their Mac’s missing Photo library, most Mac users become concerned. However, by using a few effective techniques, you can quickly recover and access your lost Photo library.
Here are some detailed instructions for recovering your Mac’s photo library.
Check If Your iCloud Photos is Turned On
iCloud is Apple’s exclusive cloud storage solution, which syncs data between all of your connected devices and serves as a backup tool. You might have disabled iCloud sync if photos from your iPhone or iPad are missing from your Mac, or vice versa.
Log in to your Mac using your Apple ID to turn it on. Activate iCloud Photos in the settings window of the Photos app by going to the Finder > Applications > Photos menu.
Restore the Photo Library from Time Machine
In a matter of minutes, you can easily restore your lost or deleted photo library if you recently created a Time Machine backup of your photo library.
If not, to solve all problems with locating and restoring the Photo library, you might need to use a picture restoration tool. Here are some steps to recover your photo library using Time Machine:
- The Time Machine backup drive should be connected to your computer.
- Then, press Enter after clicking the Time Machine icon in the menu bar. As an alternative, you can open the Apple menu, choose System Preferences, and then Time Machine.
- Time Machine will now start up and show any backups that are available. By selecting the most recent backup date, you can view your Photo library backup. Click and pick it when you’ve located it.
- Finally, click “Restore” to recover your Photo library.
It might take some time to restore your Photo Library, depending on its size.
Use Apple’s Photo Repair Tool to Restore Your Photo Library
The photo restoration program on your Mac can help you restore your Photo Library if it has become corrupted or if your photos are behaving strangely. The length of time it takes to complete this process will depend on your network speed, the size, and the number of images in your library.
Despite the slim chances, it’s worthwhile to take a chance on the photo repair tool. The only thing required of you is patience.
Make sure you are using the most recent version of macOS and that your Mac is up to date before using the repair tool to fix the Photos library. You’ll be able to quickly access your photos in the Photo library as well as speed up the process. These steps should be followed in order to recover photos using the Photo Repair Tool.
- If you currently have the Photos app open, close it before navigating to “Applications” and looking for the Photos app icon.
- Once you’ve found it, click the Photos app icon by holding down the Command and Option keys while doing a double-click.
- A dialogue box titled “Repair Library” will appear. To restore your library, select “Repair.”
You might be asked to enter your admin account and password in order to proceed. Apple advises creating a backup of your photo library before moving forward with the repair process.
Update macOS
Create a data backup before you start updating your software. Then, at that time, use the following methods to locate and install any available system updates or redesigns:
- From the Apple menu on the left side of your screen, choose System Preferences.
- Select Software Update in the menu that pops up on your screen.
- You can download updates from the App Store if your System Preferences don’t include Software Updates.
Select one of two options:
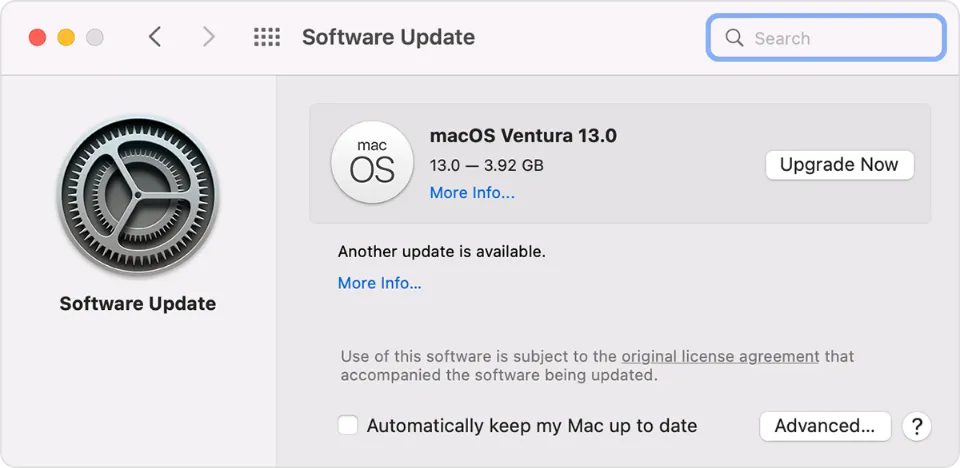
- If you choose Upgrade Now, your Mac will download the most recent update for the version you have installed, such as 10.14.5 to 10.14.6.
- If you choose Upgrade Now, your Mac will then be updated to a brand-new version known as macOS Monterey.
When Software Update notifies you that your Mac has been updated, macOS and every piece of software it installs will be current. There is also access to Safari, Calendar, Notes, Photos, Clock, and Maps.
Repairing Photos Library on Mac Using Disk Utility
If you see messages such as “Photos program shuts unexpectedly,” “a file is corrupted,” or “a volume is not working properly” on your Disk Utility for Mac is worthwhile to give it a try even though it is not designed to find or resolve disc issues. It serves as an urgent disc repair when a problem arises.

- Open your Mac’s Disk Utility application.
- Navigate to View > “Show All Devices.”
- In order to perform additional troubleshooting, select the disc or volume that is causing the issue. Then select the First Aid option.
- To begin the process, click “Run,” followed by “Continue.”
Try different approaches if Disk Utility is unable to resolve your Photos Library issues or you receive a message indicating that the First Aid procedure was unsuccessful.
Rebuild iPhoto’s Photos Library
To fix this problem, use Photos Library First Aid in an older version of iPhoto on your Mac. You are able to restore the iPhoto library database using it. It allows you to select one of the four alternatives listed below:
- Repair Permissions: If the photo library won’t open or if you get a message saying you can’t edit your photos, choose this option.
- Rebuild Thumbnails: Use this if you notice dark boxes on your image documents and incorrectly displayed iPhoto thumbnails.
- Repair Database: If unexpectedly pictures have disappeared from your Photo Library, choose this option.
- Rebuild Database: If iPhoto crashes, freezes, won’t load, or the database can’t be read, choose this option. The question of how to recover an iPhoto library should now have its definitive response.
Unhide Your Hidden Album
It’s also possible that you accidentally hid your photos if they vanished from your MacBook Pro despite your assurances that you didn’t delete them. Additionally, if you enabled iCloud Photos, you could hide your photos on one device and have the change appear on all of your connected devices.
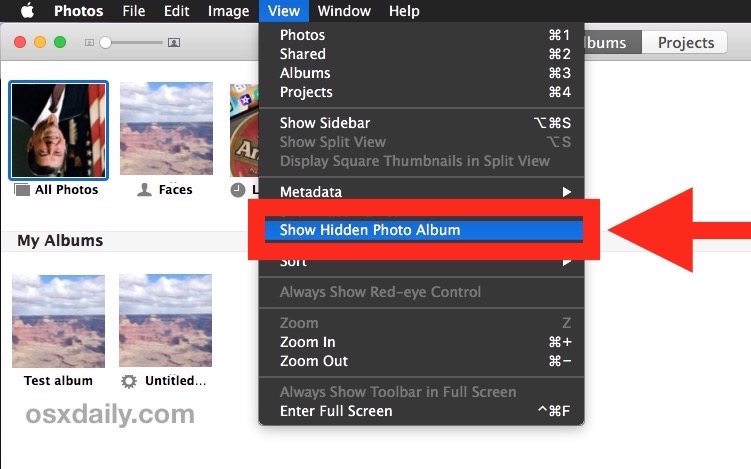
To unhide your photos, launch the Photos app (Finder > Applications) and click View > Show Hidden Photo Album, which makes this album accessible in the left sidebar. Click it, then right-click the photos you want to recover and click Unhide.
Conclusion
It can be disastrous to lose photos from your photo collection because of faulty technology or human error. However, if you adhere to and carry out the above steps, you will quickly be able to locate your misplaced items.
There are many possible causes for missing photos on Mac, including mistaken deletion, corrupt updates, and drive corruption. Occasionally, the user has no control whatsoever. We strongly advise making backups of both your photo libraries and individual photos in order to prevent the worst effects of data loss.