
Here’s how to print on a Mac with the Apple Menu Bar or keyboard shortcuts if you want to use a MacBook.
On a Mac, printing a file or web page is simple and accessible from almost any program. A Mac also has the ability to print in color, black and white, or double-sided. Use the Apple Menu Bar or keyboard shortcuts to print on a Mac by following these instructions.
So let’s begin.
Connecting Printers to a MacBook
Before getting into the specifics, you should be aware that there are three ways to connect your MacBook and printer. To connect the printer, you have to keep your MacBook updated so that the printer can get recognized by your MacBook easily the following are the ways by which you can connect your MacBook with the printer:
Connecting Your Printer Wirelessly With MacBook
These days, the majority of printers have the ability to connect wirelessly using either Bluetooth or Wifi. Therefore, you must first join your printer to the same network as your MacBook.
- To connect your MacBook to a printer, go to the printers and scanner section of the system preferences and add the printer.
- Simply click the plus sign to add the printer.
- Next, you will see the printer name in the tab click on it, and below in the image you can see there is the option named “use” in which you will find various options the first one is “AirPrint” which is basically the driver your For printing, a MacBook is used.
- There are some cases in which your printer might not be compatible with “AirPrint” and you have to install the software given along with the printer.
Similarly to this, if you don’t have the print driver, choose the Auto Select option, and your MacBook will download and install it for you. You simply need to click the Add icon located at the tab’s bottom to proceed.
Connecting Your Printer With MacBook Using a Wired Connection
You can use a USB cable to connect your printer, so all you have to do is plug one end of the cable into the printer’s standard USB port and the other end into the type-C port on your MacBook.
Once the printer is connected to your MacBook, you must add it by selecting the printers and scanners option under System Preferences.
The printer will then need to be added because your MacBook will already be able to detect it. To do this, click the plus sign, choose the printer, and then click add.
Connecting Your Printer With MacBook Using Its IP Address
Additionally, there is a method for using your printer’s IP address to link it to a MacBook if you know it. After selecting the plus icon in the printers and scanners menu, select the IP option in the top menu bar.
The basic steps are the same as what we have already described above to add a printer using an IP address.
How to Print on MacBook?
It takes little time and is easy to print on a MacBook. Your printer needs to be connected to your MacBook and configured first.
The most typical method of attaching a printer to your MacBook is via a USB cable. Depending on the model of your MacBook, a USB-A to USB-C adapter may be required. When you connect the printer to your MacBook, macOS ought to detect it and start downloading any necessary drivers or software.
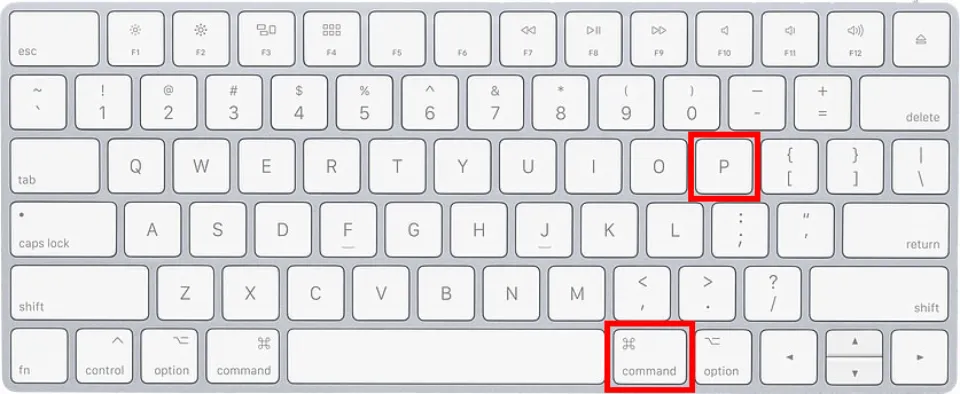
Depending on the application you print from, things might vary just a bit, but the almost universal command to begin the printing process is: Command + P
You can also select File from the menu at the top of the screen, then select Print. In either case, the printing settings menu will appear, allowing you to edit the document’s formatting and other features before selecting the Print option.
That is all there is to it, though we will look at a few of those settings below. Press Command P to start printing your document, or choose File > Print from the menu.
Wireless Printing Connections
Printers that are wireless or Wi-Fi are gaining popularity. There is no physical cable to plug in for the wireless printing procedure, which is the same as the one described above.
To print to a Wi-Fi printer, simply:
- Press Command P or select File, then Print.
- From the list of available printers in the dialog box, choose the wireless printer.
- Click Print.
Print Settings
On your MacBook, you can change various print settings before printing the final copy of your document. Once you hit the print command, a dialogue box similar to this will appear:
As you can see, there are a number of choices as well as a brief preview of the printed document.
Here, you can select various options, including how many copies of the document you want, the color scheme and layout you prefer, the page range, and any other preferences you may have for the document.
Although Microsoft Word-specific, many other programs, and apps offer essentially the same options in this step.
You can make any last-minute adjustments to your document in this print preview and settings menu before printing, giving you time to get everything just right before pressing the Print button in the bottom right.
It’s okay if you make a mistake and discover it after printing a page. Just go back to your document and make the necessary adjustments until everything is set up exactly how you want it.
This video explains how to print on a MacBook:
Final Thoughts
Printing is a basic task on a MacBook; all you have to do is press “Command + P” in most apps. The fundamentals of printing are straightforward, but these extra printing resources from Apple are useful for troubleshooting printing issues on your MacBook.
Therefore, we have outlined a step-by-step procedure for making prints from your MacBook for those who are new to using one. Additionally, we have listed the different ways you can connect your MacBook to your printer.